Register your device CA
Purpose
Upload the certificate authority your birth certificates chain to, so any device in this batch can prove its identity without listing every device's AK fingerprint by hand. See How device identity works for why this is per batch, not per device, and How device identity works for which certificates a gateway carries and what a manufacturer delivers per batch.
Prerequisites
- Signed in, with Orders (menu group OEM) open — see Sign in.
- Org-Admin role. Setting a trust anchor is an administrative act, not an editing one — an Editor account can claim and configure devices but cannot assign or change what a batch trusts.
- Your device CA certificate, in PEM format, matching the birth certificates
your batch's devices carry. It must be a real CA (
CA:TRUE), not yet expired, and use a supported signature algorithm. - A way to confirm the fingerprint with your manufacturer through a second channel, once uploaded (see step 6).
Steps
Choose a mode
-
Go to Orders, then click the order you're configuring.
-
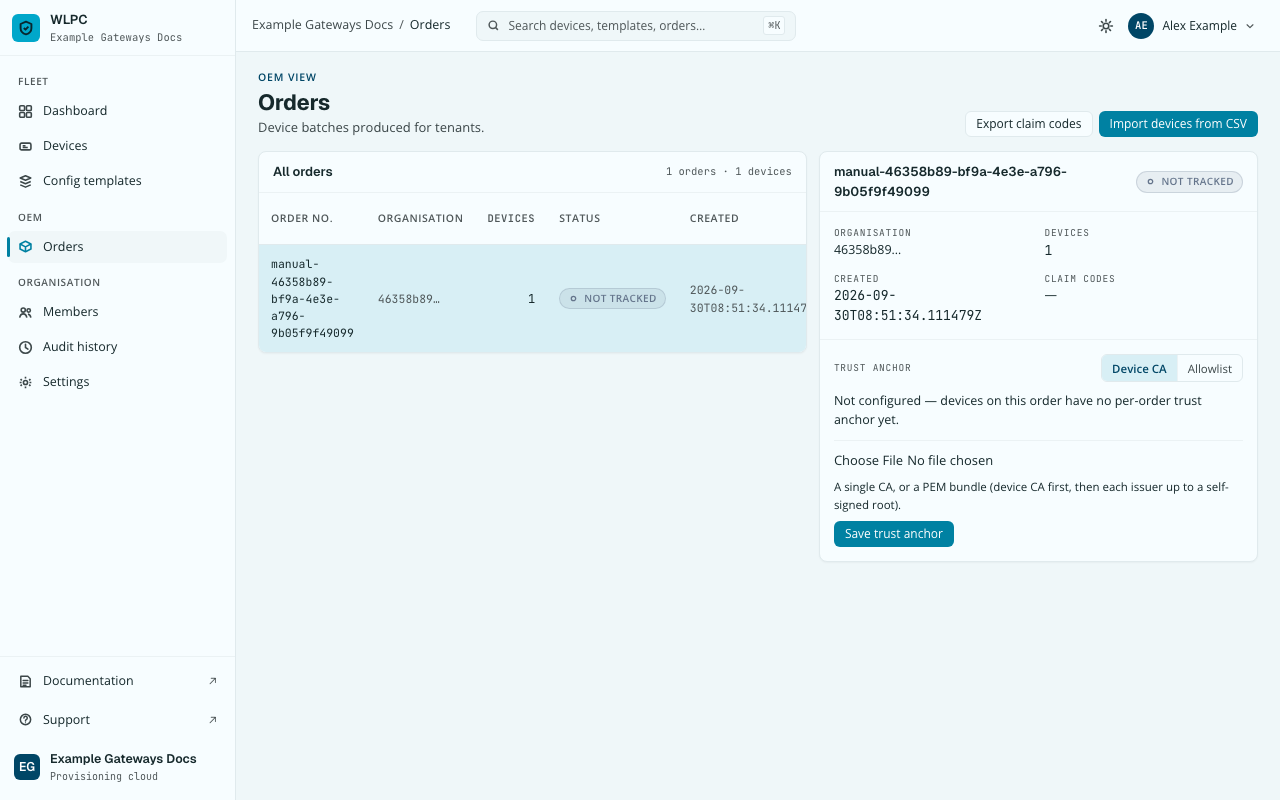
On the order's detail panel, find Advanced, "How devices in this batch are verified — usually set by the manufacturer", and click Show. The Trust anchor settings open. A new order shows Not configured and defaults to the Device CA tab.
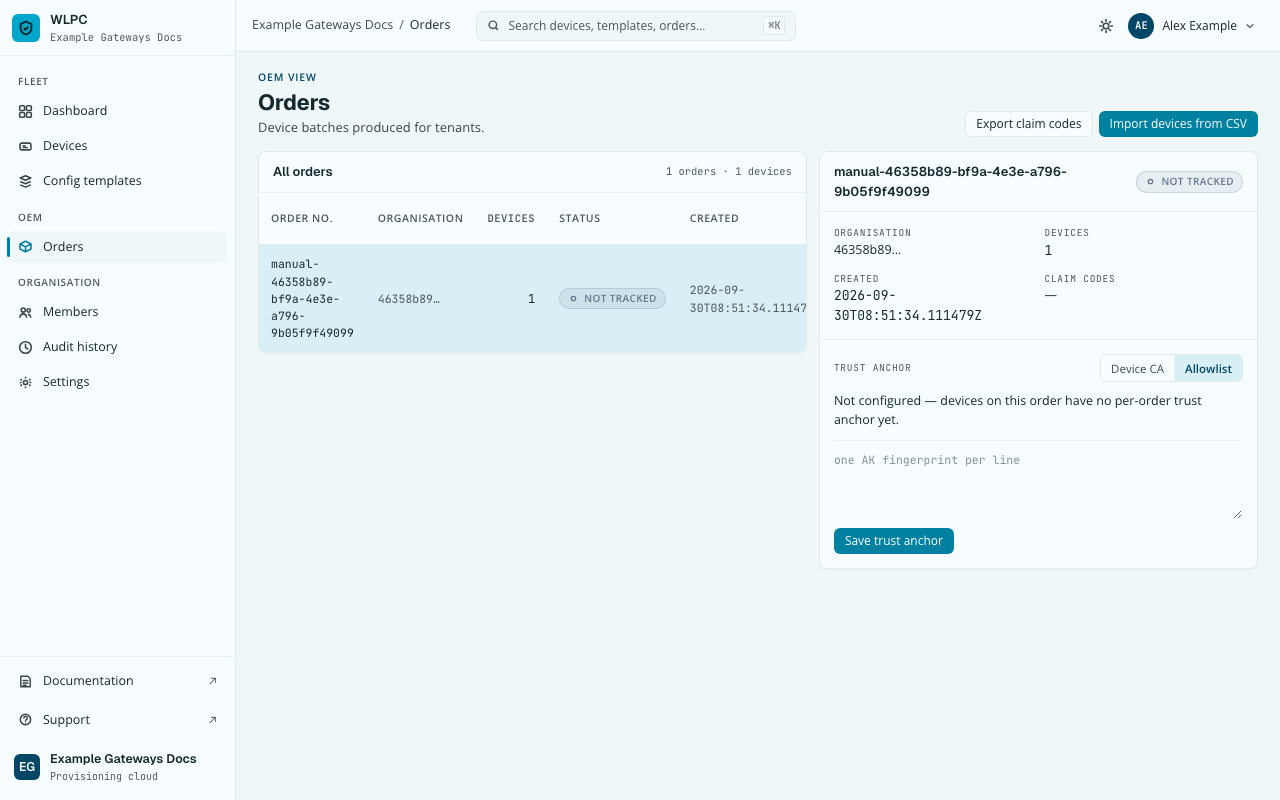
The Allowlist tab takes AK fingerprints instead — one per line, no certificate involved. Use it only if you have no birth-cert chain to offer. The Device identity certificate tab is described below.
Upload the CA
-
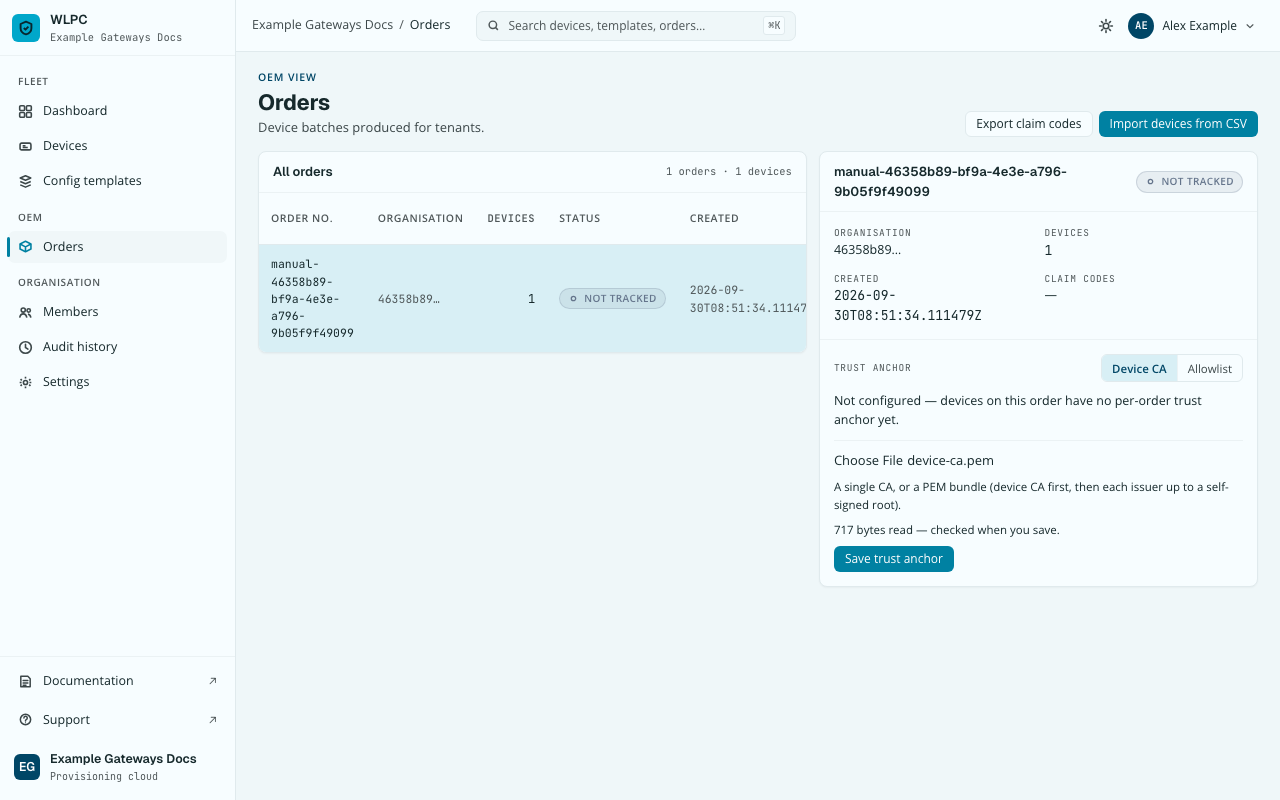
On the Device CA tab, click Choose File and select your CA's PEM file. The panel reads the file locally and shows its byte size — nothing is validated until you save.
-
Click Save trust anchor.
-
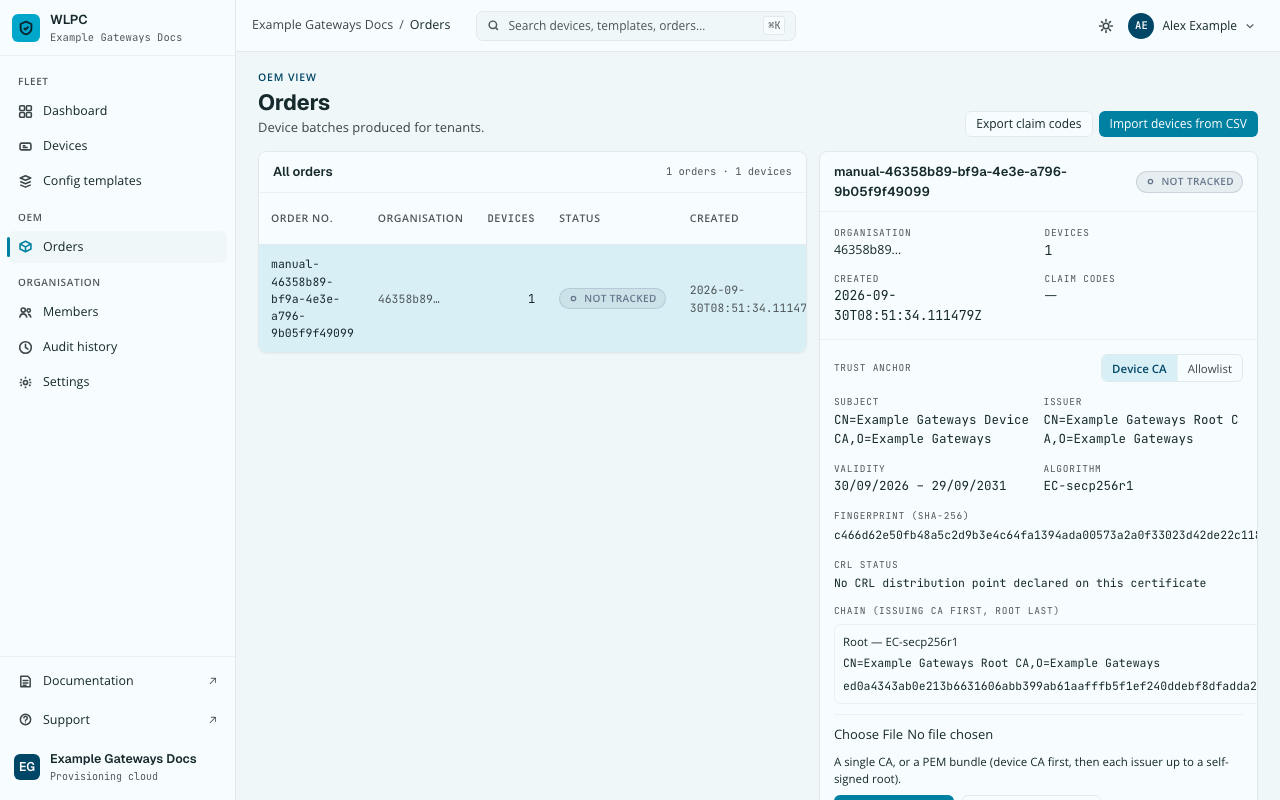
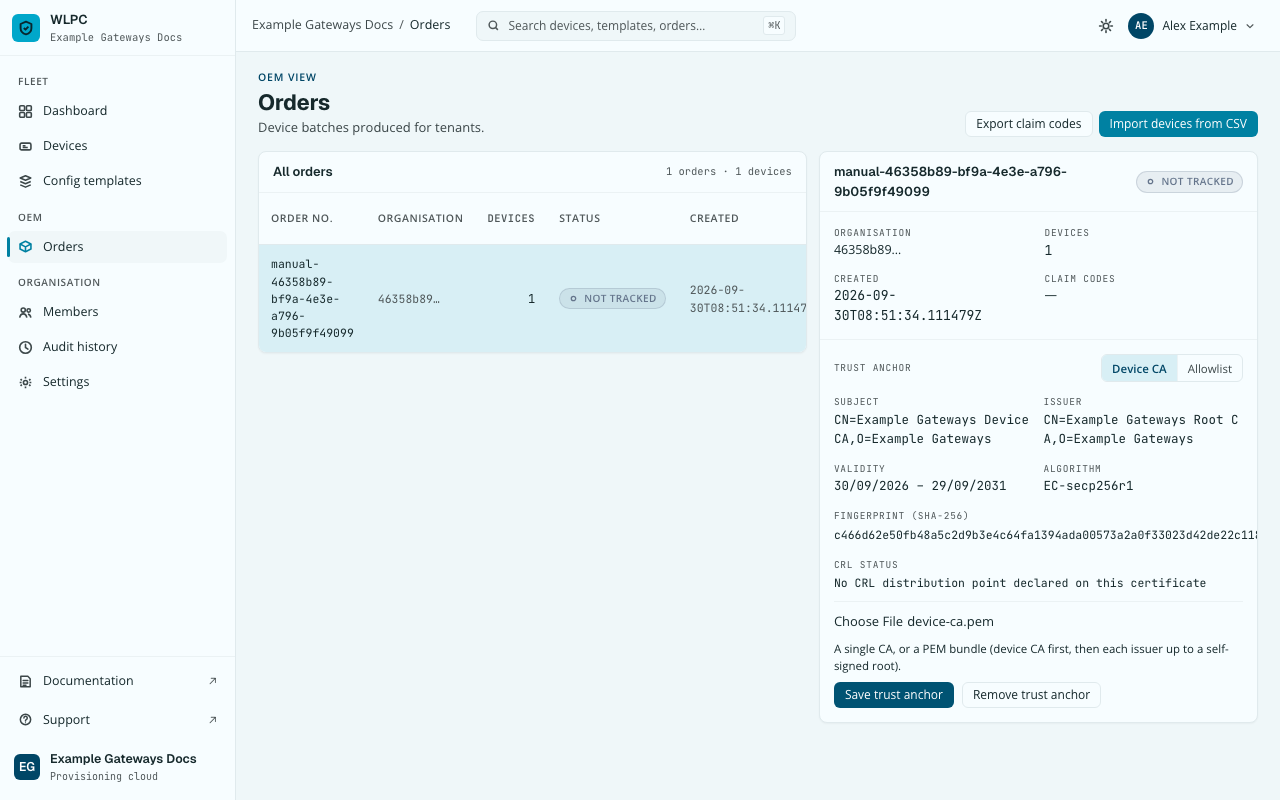
Check the fields the platform parsed out of your certificate — Subject, Issuer, Validity, Algorithm, Fingerprint (SHA-256), and CRL status (declared distribution point, or "No CRL distribution point declared on this certificate" if it doesn't carry one).
- Confirm the SHA-256 fingerprint shown matches what your manufacturer actually issued — a call, an email, anything other than this same page — before telling anyone devices under this order are ready to check in. The platform only reports what it parsed from the file you uploaded; it has no independent way to know that file is genuinely your manufacturer's CA.
Expected result
The Trust anchor panel shows your certificate's parsed subject, issuer, validity window, algorithm, fingerprint, and CRL status, with Save trust anchor and Remove trust anchor now both present.
Replacing or removing a CA
Uploading a new file and clicking Save trust anchor again replaces the configured anchor — there's no separate "replace" action.
Clicking Remove trust anchor shows a browser confirmation ("Remove this order's trust anchor? Devices on this order will fall back to the default.") — confirm it to actually remove the anchor, which then shows "Not configured" again.
What \"fall back to the default\" means
Once no order-specific trust anchor is configured, a device on that order is checked against the platform's own global default instead — a single mode (device CA or allowlist) and a single set of manufacturer material the platform operator configured once for the whole deployment, independent of any order. Removing your order's trust anchor does not open it to arbitrary devices: it falls back to that platform-wide baseline, which admits only what the operator put in it. A device from a manufacturer the platform-wide default doesn't recognize is refused, not loosely admitted — ask your platform operator what the current default actually covers before relying on it for anything.
Common errors
| Exact UI message | What to do |
|---|---|
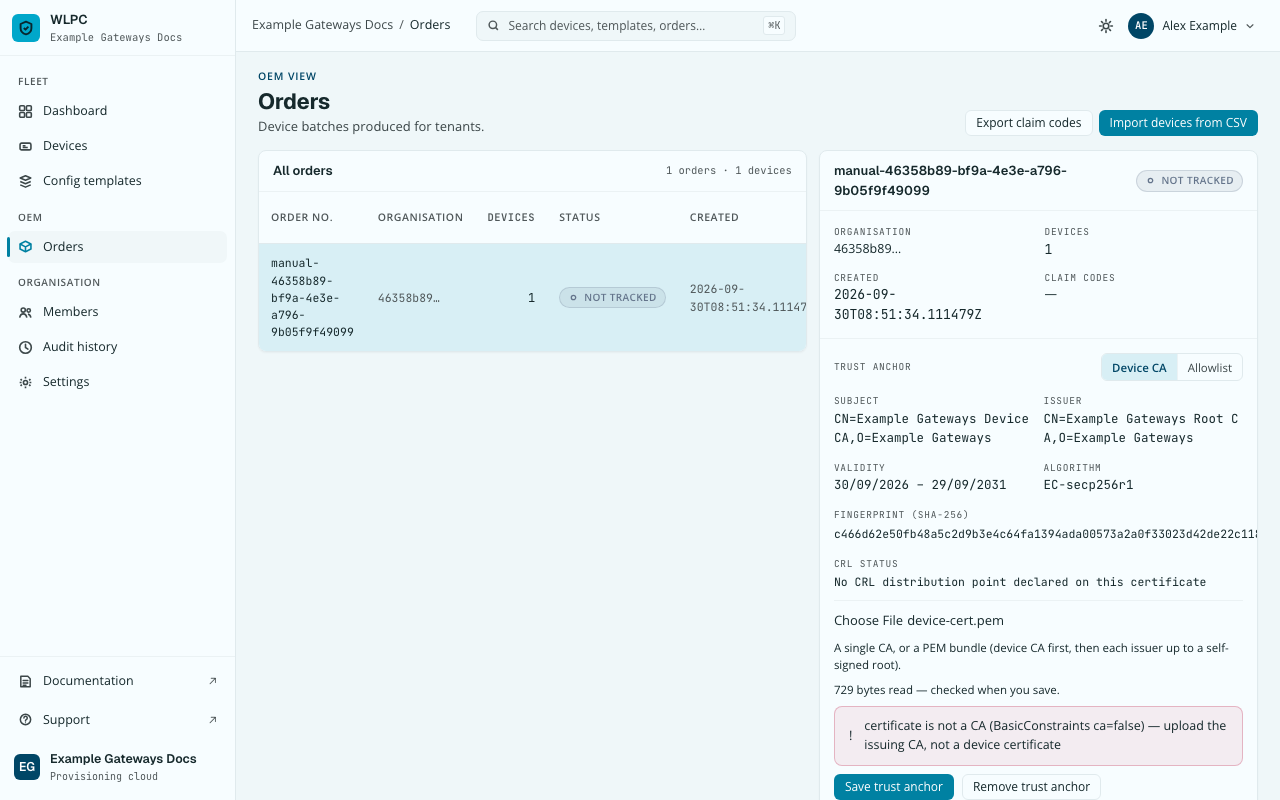
certificate is not a CA (BasicConstraints ca=false) — upload the issuing CA, not a device certificate |
You uploaded a device/leaf certificate. Upload the CA that issued your birth certificates instead. |
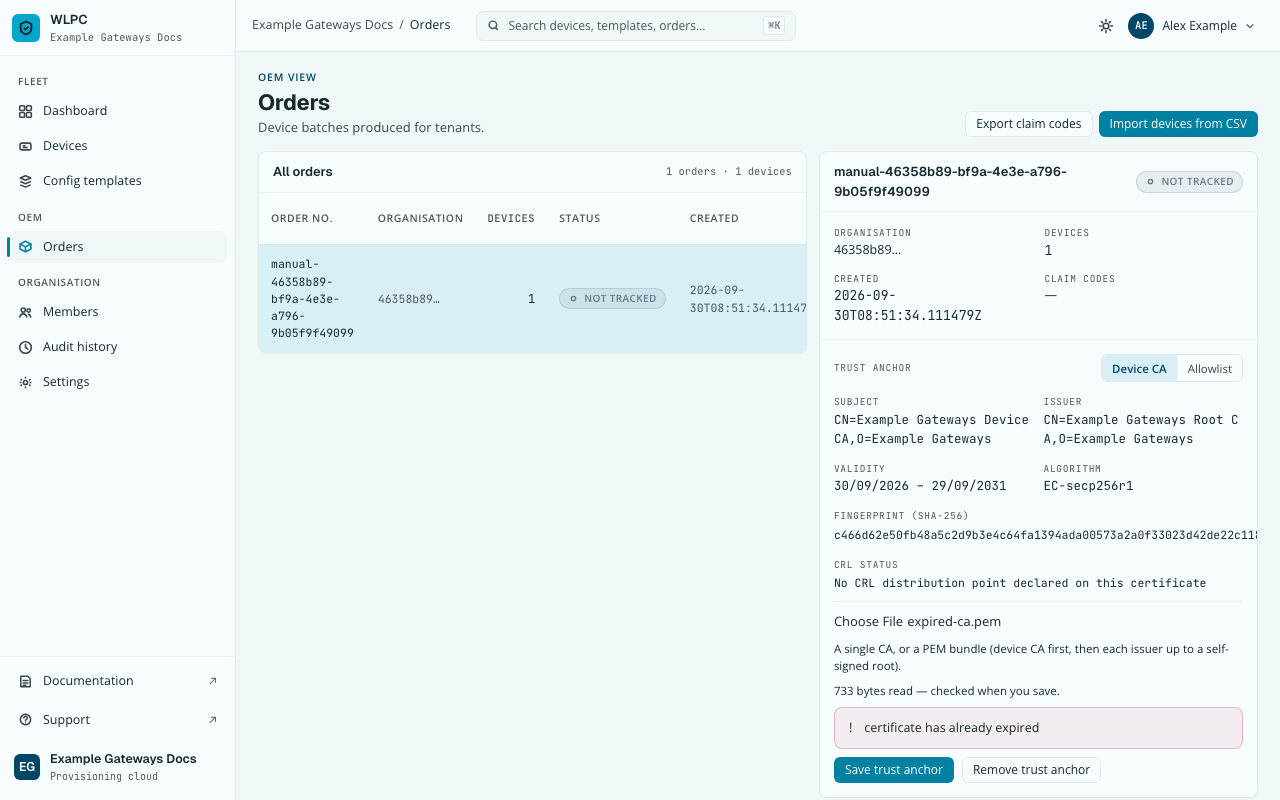
certificate has already expired |
Check the CA's validity window (openssl x509 -noout -dates -in your-ca.pem) and get a current CA from your manufacturer. |
Strength and chain errors
| Exact UI message | What to do |
|---|---|
RSA key is 1024 bits; a trust-anchor CA must be at least 2048 bits |
Get a stronger key from your manufacturer — RSA must be at least 2048 bits. |
EC curve secp224r1 is not accepted for a trust-anchor CA; use one of ['secp256r1', 'secp384r1', 'secp521r1'] |
Use a CA on P-256, P-384, or P-521. |
certificate is signed with SHA-1, which is not accepted for a trust-anchor CA |
Get a CA re-issued with a current signature algorithm. |
upload contains private key material — upload the CA certificate only, never its private key |
You uploaded a file with a private key in it (yours or the manufacturer's). Strip the key block and upload only the certificate — treat that key exactly as you would any other private key from here on, including rotating it if it was ever a real one. |
unsupported certificate key type for a trust-anchor CA; use RSA (>= 2048 bits) or ECDSA (P-256, P-384, or P-521) |
An Ed25519 (or other) key type was uploaded. Only RSA and ECDSA are accepted for a trust-anchor CA. |
certificate 0 in the bundle is not signed by certificate 1; upload the device-facing CA first, then each issuer up to the root, in order |
Your bundle's certificates are in the wrong order, or aren't actually a chain. Order matters — see Uploading a chain below. |
CA chain is incomplete: the last certificate is not a self-signed root |
A multi-certificate bundle must end in a self-signed root. A single CA with no chain is still fine on its own — see below. |
Minimum strength is enforced
RSA keys must be at least 2048 bits; ECDSA must use P-256, P-384, or P-521. SHA-1 signatures are refused. Ed25519 is refused too, even though other certificate-upload paths on this platform accept it — only RSA and ECDSA are accepted for a trust-anchor CA specifically. Uploading a certificate with its own private key bundled in the same file is refused outright, before anything is stored.
The Allowlist tab's fingerprint field is validated the same way: every entry must be 64 lowercase hex characters, or the whole save is refused.
Uploading a chain (root + intermediate)
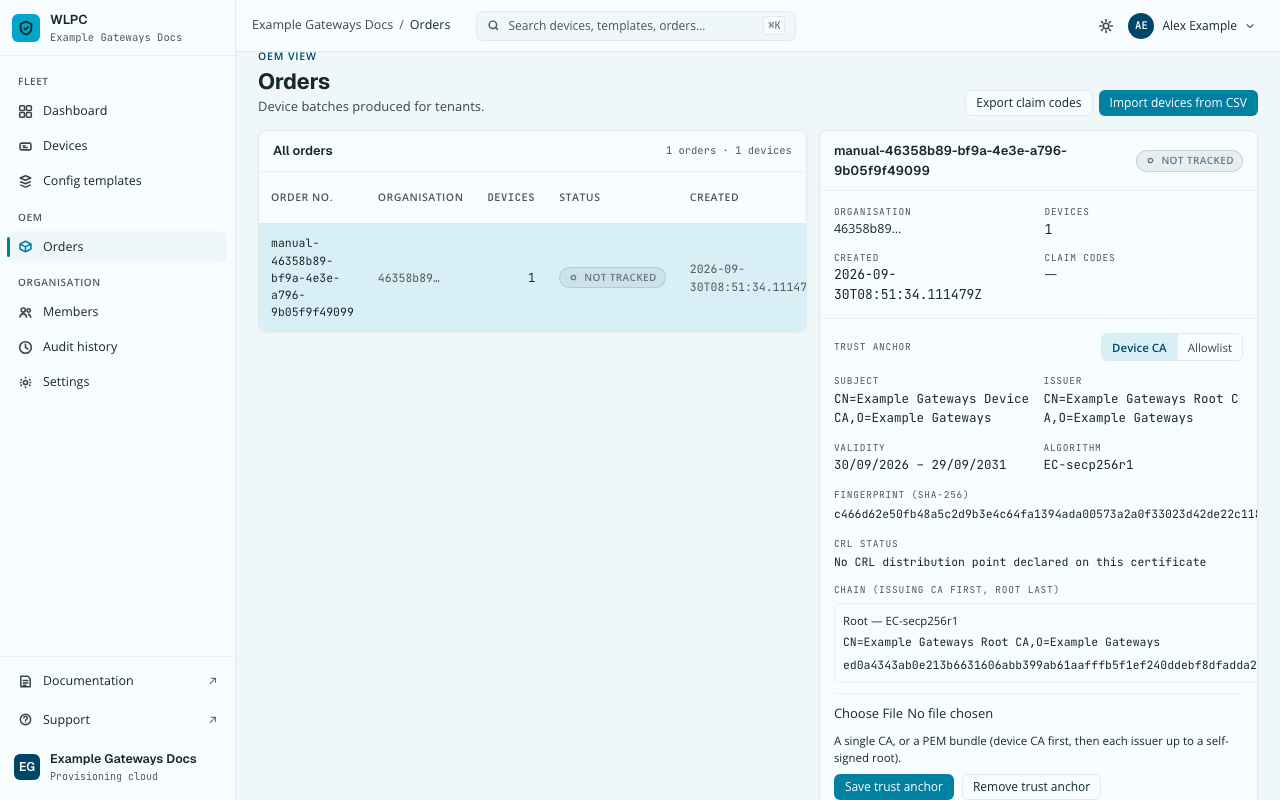
If your birth certificates chain through an intermediate to a root — the common shape when a manufacturer's CA has its own issuer — upload the whole bundle as one PEM file: your device-facing CA first, then each certificate that issued it, ending in the self-signed root. The panel shows every link, labelled with the root at the end:
A single CA with no further chain (the original, still-supported shape) works exactly as before — a bundle is only required when you want the full chain represented and verified.
Device identity certificate
Use this mode when your gateways carry an identity certificate from a CA that you or the manufacturer run. What the mode does, and when certificate only is acceptable, is explained in Device identity certificate.
Set it up
-
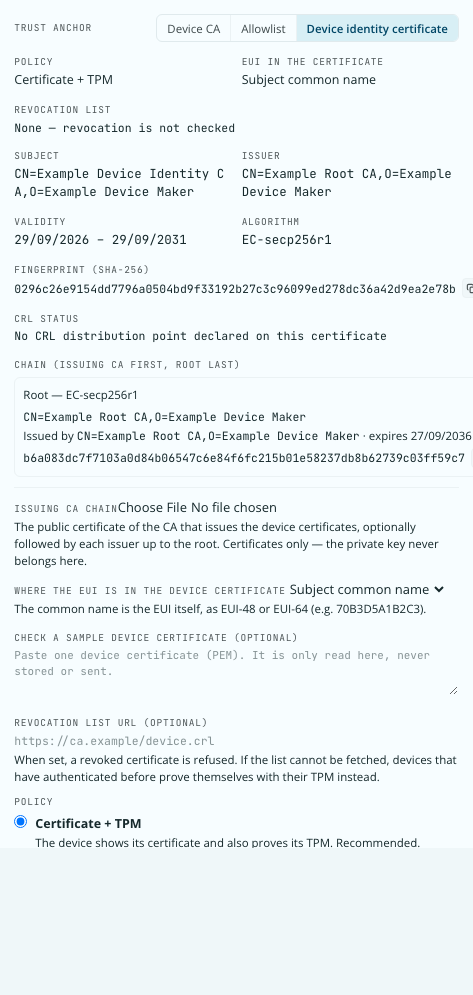
On the order's Trust anchor, choose the Device identity certificate tab. Certificate + TPM is preselected.
-
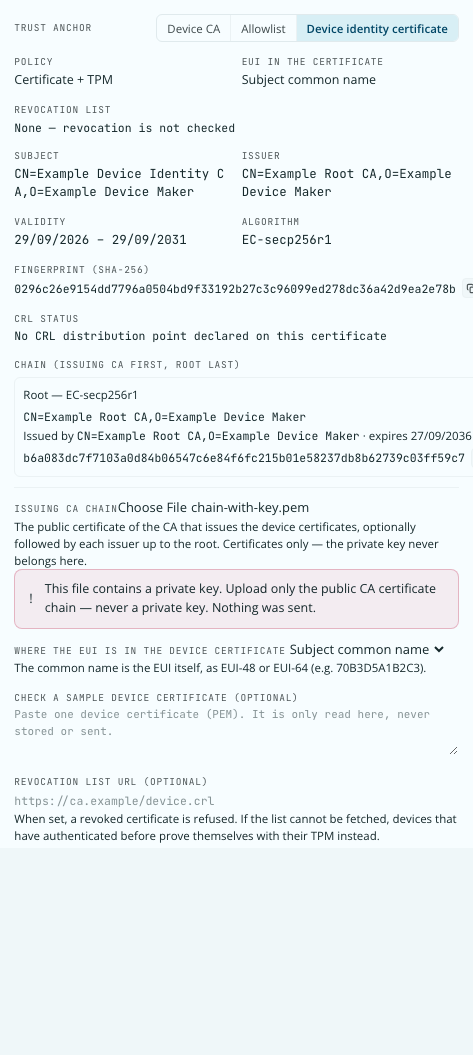
Under Issuing CA chain, click Choose File and select the public CA chain (PEM): the issuing CA, optionally followed by each issuer up to the root. A file that contains a private key is refused on the spot, before anything is sent.
-
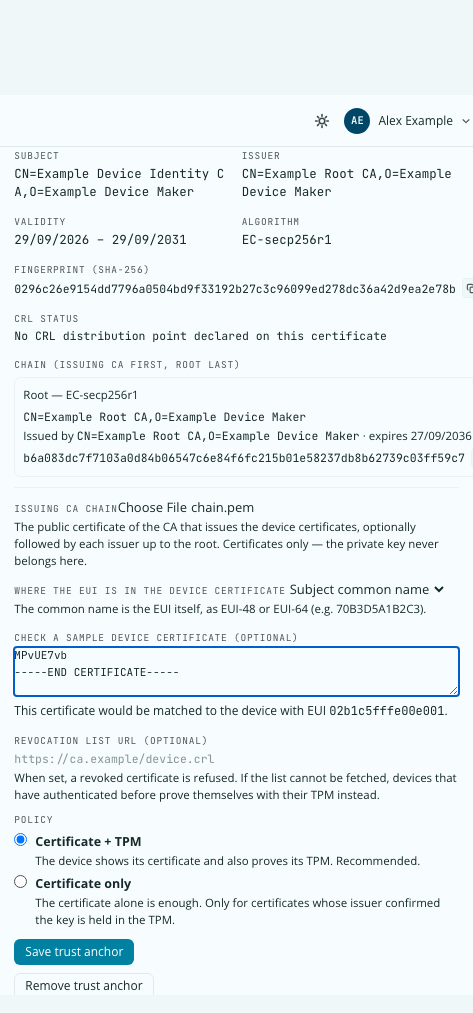
Under Where the EUI is in the device certificate, choose the field. To check your choice, paste one device certificate into Check a sample device certificate: the panel shows the EUI the platform would match it to. The certificate is only read in your browser, never stored or sent.
-
Optionally enter the Revocation list URL (http or https).
- Keep Certificate + TPM, or choose Certificate only, see below.
-
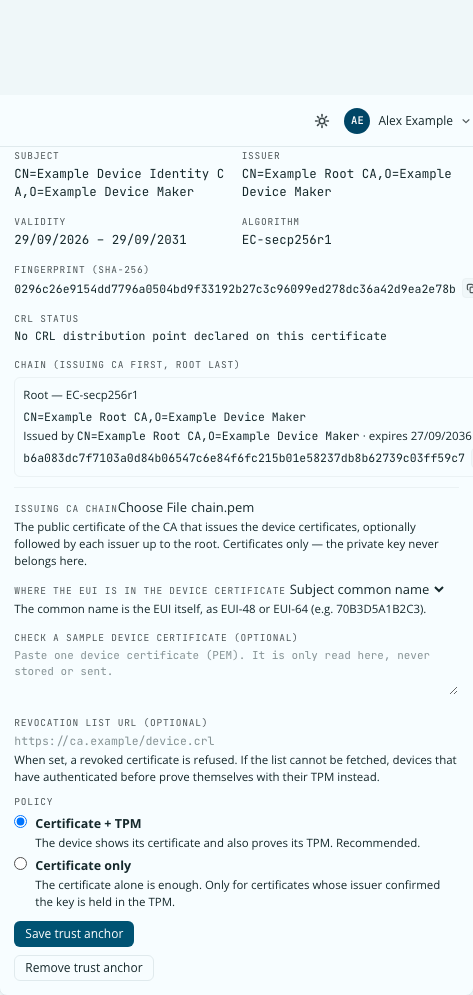
Click Save trust anchor. The panel shows the policy, where the EUI is, the revocation list, and for every certificate in the chain its subject, issuer, expiry and SHA-256 fingerprint. Confirm the fingerprint with the certificate issuer through a second channel.
Certificate only
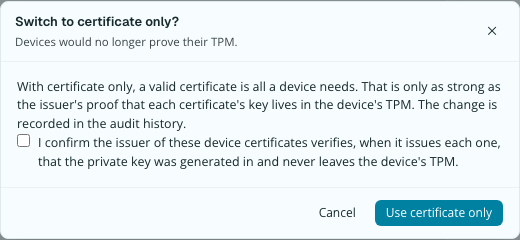
Choosing Certificate only opens a confirmation. Use certificate only stays disabled until you tick that the certificate issuer verifies, each time it issues a certificate, that the key was generated in the gateway's TPM and never leaves it. Save afterwards as usual.
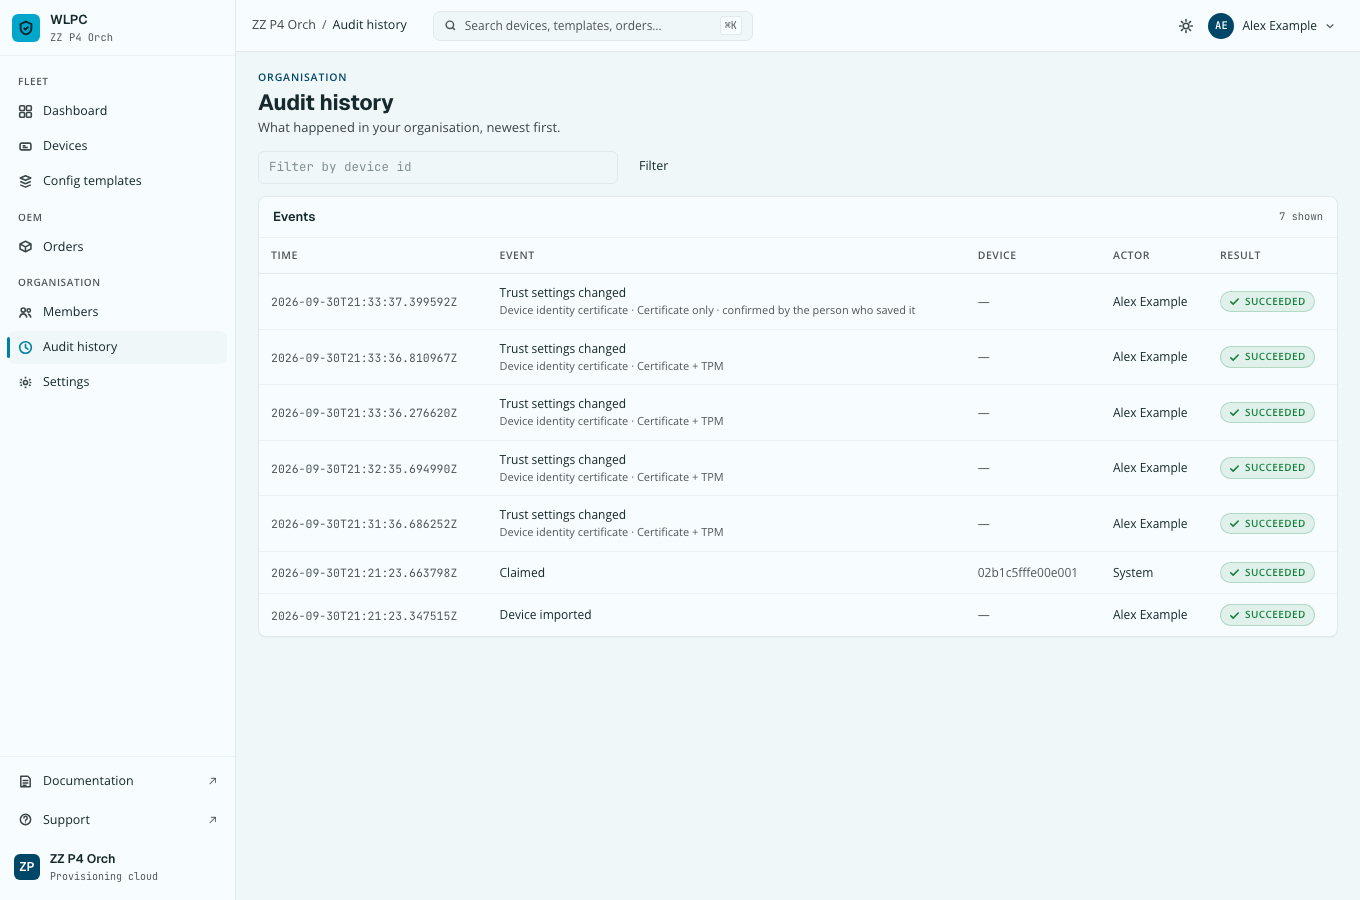
The change is recorded: Audit history shows it as Trust settings changed, with the mode, the policy and that it was confirmed.
Messages
| Message | What to do |
|---|---|
This file contains a private key. Upload only the public CA certificate chain — never a private key. Nothing was sent. |
Remove the key block and upload the certificates only. Treat the key as exposed if it was ever a real one. |
Certificate only needs the confirmation. Tick the box in the dialog and save again. |
Choose Certificate only again, tick the confirmation and save. |
The revocation list address must be a full http or https URL. |
Enter the complete address, including https://. |